

Executive summary
The tooling to do UI testing properly has existed for years. The bottleneck has always been the time it takes to write and maintain these tests. We built a CLI tool that uses Computer Use Agents to run them for you: catching bugs, mapping user flows, and generating Playwright tests from plain-language descriptions. This post explains how Computer Use Agents work, a Command Line Interface (CLI) we built, and what running it on a real project taught us.
What is a computer use agent?
Before we get into the tool, here is what a Computer Use Agent actually is. The concept is simpler than it sounds.
A Computer Use Agent, or CUA, is an AI agent that interacts with a computer the way a human does. It looks at a screenshot of the screen, decides what action to take, and outputs an action: a mouse click at specific coordinates, a keystroke, a scroll. Your code executes that action inside the environment, a new screenshot is taken, and the loop repeats. That is the whole thing.
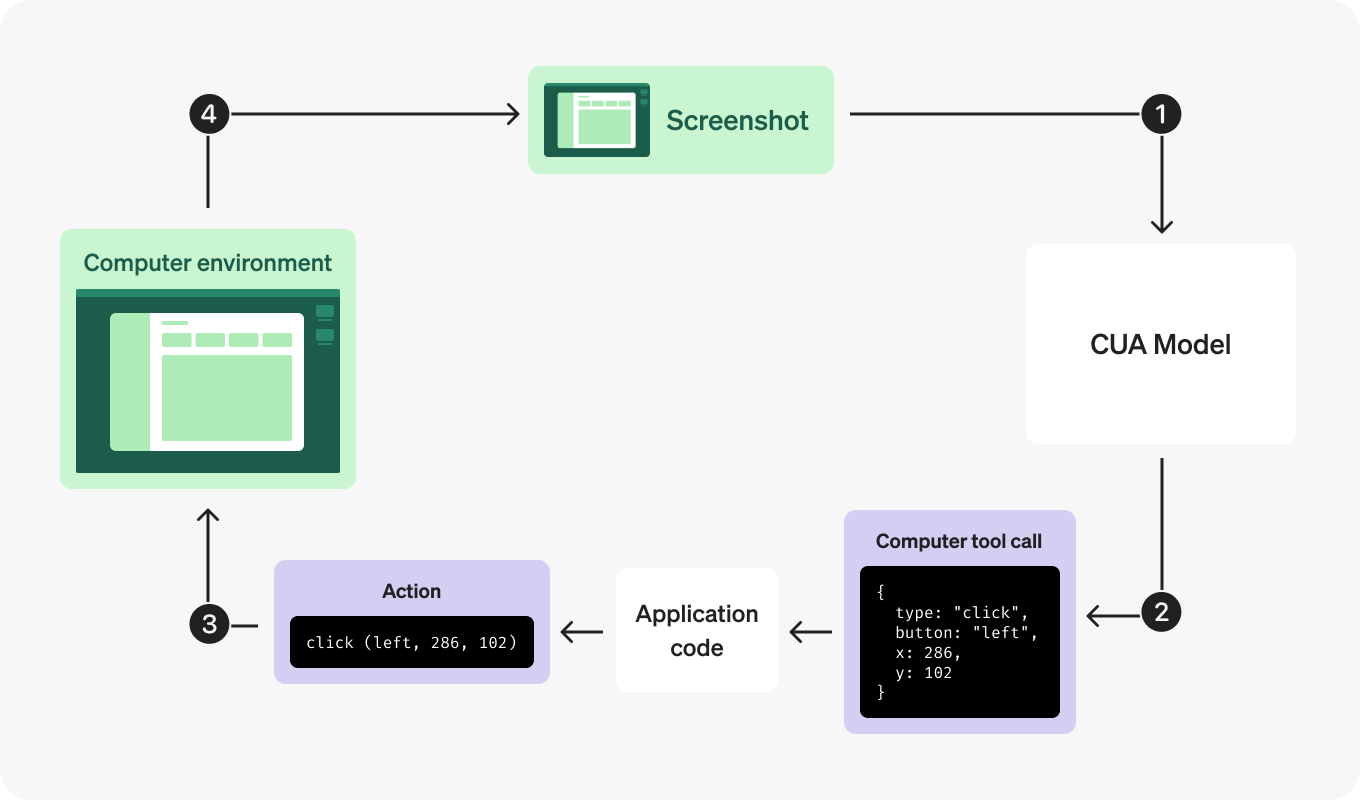
Computer Use Agent four-step loop diagram. Source: https://developers.openai.com/api/docs/guides/tools-computer-use
The four-step loop looks like this:
- A screenshot of the computer environment is sent to the CUA model.
- The model returns a computer tool call, which is a structured JSON instruction describing the next action to take, for example: {type: “click”, x:286, y:102}.
- Your application code executes that action inside the environment.
- A new screenshot is taken and sent back to the model. Repeat.
One thing worth emphasizing: the model does not execute the action itself. It only decides what to do. Performing the actual click or keystroke in the running environment is the developer’s responsibility. That distinction is important when building on top of CUAs, because the environment setup and action execution are not handled for you.
For browser-based agents specifically, the Document Object Model (DOM) is an alternative to screenshots worth knowing about. Rather than sending a pixel-level image, you can pass the DOM to the model instead. The DOM is a structured, tree-like representation of a web page’s HTML elements: like the page’s blueprint rather than a photograph of it. This reduces token usage and tends to improve reliability on well-structured web applications.
Setting Up the Environment
Almost anything can serve as the computer environment: a full Linux or Windows desktop, a browser window, or a sandboxed container. We went with a Debian container running a browser. Debian is a Linux distribution, and a good choice for a lightweight environment.
To make it work, you need three things:
- a graphical user interface
- a utility to execute the agent’s actions
- a utility to take screenshots
We used xdotool for mouse and keyboard input and ImageMagick for screenshot capture.
Choosing a Model
Not all models handle computer use equally well. We evaluated several frontier models by setting up a small benchmark. Each model ran on a fixed set of tasks with default reasoning settings, and we measured success rate, average time per task, and cost per task.
Claude Sonnet 4.6 delivered the strongest accuracy in our initial benchmark. GPT-5.4 stood out for a different reason: fastest, cost-efficient, and it could line up several actions per turn rather than one. That parallelism speeds up the loop significantly. After raising GPT-5.4’s reasoning effort to high, its performance improved drastically, which is why we chose it for our use case.
| Model | Success Rate (Total) | Avg. Time / Task | Avg. Cost / Task | Avg. Tokens / Task |
| Claude Sonnet 4.6 | 70% (7/10) | 302.64s | €1.4355 | 496,649 |
| Gemini-3-Flash | 45% (9/20)* | 191.07s | €0.1110 | 238,798 |
| Gemini-2.5-Computer Use | 43% (13/30) | 221.80s | €0.1400 | 103,139 |
| GPT-5.4 | 43% (13/30) | 153.45s | €0.4095 | 552,413 |
Benchmark comparison of frontier models on computer use tasks
Why apply CUAs to UI testing?
User Acceptance Testing, or UAT, is the process of verifying that a piece of software behaves correctly from an end user’s perspective. It typically involves running through real user scenarios on a live or staging environment to catch bugs, find missing functionality, or identify broken flows before a release reaches production.
Manual UAT is expensive and prone to gaps. A developer or tester opens a staging environment, clicks through a handful of flows, files a couple of tickets, and calls it done. In enterprises, UAT is rarely done by the developer themselves: it falls to a dedicated QA or testing team, which makes the cost of doing it manually even higher.
The scale of this gap is large. Capgemini’s World Quality Report 2025–2026 reports that 43 percent of organizations are now piloting or deploying generative AI in their quality engineering workflows, with test case design leading adoption.
Automated testing with Playwright exists precisely to solve this. Playwright tests run in CI pipelines, are deterministic, and catch regressions automatically. The bottleneck is writing and maintaining them: you need to understand the application’s component structure, follow the project’s code style, and produce selectors that are stable enough to survive UI changes.
Most teams never quite make that investment, ending up with patchy coverage or brittle test suites that break with every UI change. Part of the promise of agent tooling is making the proper approach easier to reach: lowering the bar enough that good practices become the default rather than a heroic effort.
A Computer Use Agent can navigate your application the same way a human tester would. That makes it a natural fit for three specific UAT problems:
- Discovering what user flows exist in an application, even without prior documentation
- Finding bugs in a web application given a plain-language description of what it should do
- Generating Playwright tests from a natural-language flow description, stable enough to run in a CI/CD pipeline.
We built cua-uat, a Python-based CLI tool with three agentic pipelines to tackle each of these.
`cua-uat`: three pipelines, one CLI
cua-uat is a Python-based CLI tool that we have developed with a single entrypoint and three subcommands:
uv run cua-uat <bug-finder | user-flow | playwright-writer>
A quick overview of what each pipeline does:
| PIPELINE | INPUT | OUTPUT | BEST FOR |
| User Flow Generator | URL + codebase path | UAT_REPORT.md with flows and edge cases |
Mapping undocumented applications |
| Bug Finder | Gherkin .feature file + URL | HTML/MD bug report with GIF evidence |
Testing known flows against a live site |
| Playwright Writer | Natural-language flow + URL | .spec.ts test file |
Generating CI-ready tests from descriptions |
Overview of cua-uat pipelines
Each pipeline uses a different underlying execution mechanism, chosen based on what that pipeline needs. The bug finder and Playwright writer rely on GPT-5.4’s built-in computer tool, which manages the screenshot-action loop natively. The user flow generator uses Browser Use, a browser automation framework, rather than a raw computer use agent loop.
Pipeline 1: user flow generator
Before you can write test scenarios, you need to know what to test. On an undocumented project, that discovery phase is itself a real-time investment. The User Flow Generator is designed to automate it.
Point it at a URL and a codebase path. It explores the deployed application and the source code together and produces a structured report: a list of product areas, candidate user flows for each area, and edge cases. A product area is a logical section of the application, for example “Authentication”, “Home page”, or “Settings”, grouping related functionality a tester would typically cover together.
The main output is a UAT_REPORT.md file, alongside separate JSON catalogs that enumerate the discovered areas and flows in a machine-readable format.
Input: A target URL and a local codebase path.
Output: A UAT_REPORT.md with product areas and user flows, plus JSON catalogs for each.
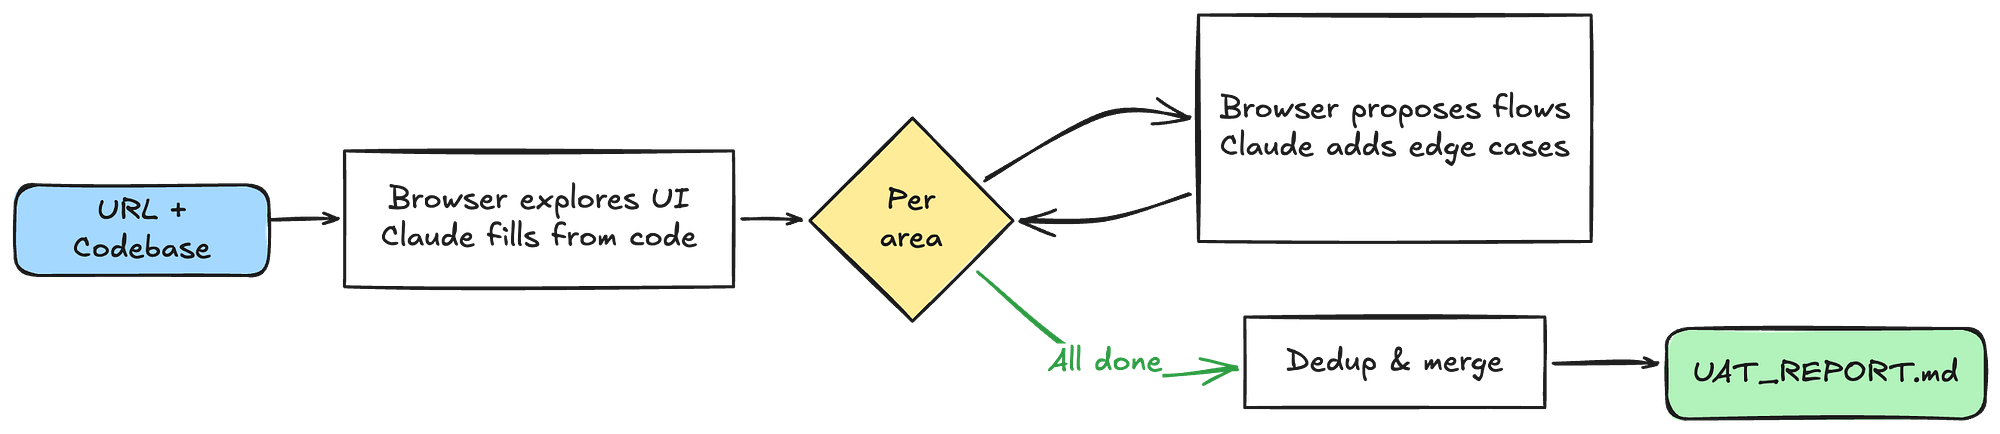
User flow generator pipeline diagram
The pipeline works in two stages per product area. A Browser Use agent powered by GPT-5.4 navigates the live application and proposes candidate user flows based on what it can see and interact with. Next, a Claude agent (via Claude Agent SDK) reads the codebase to add flows and edge cases that are present in the code but not immediately visible from the UI: error states, permission boundaries, or conditionally rendered components that only appear under specific conditions.
Once all areas are processed, the flows are deduplicated semantically by another AI agent. Similar flows that both agents surfaced get merged rather than duplicated, and the final report is written.
This pipeline is the slowest and most expensive of the three, typically taking more than 25 minutes and costing between €3 and €7 for a full discovery run. It is designed to run once per project or once per major feature area, not on every commit. It is the step you run before you start writing scenarios, not the one you automate in CI.
Pipeline 2: bug finder
The Bug Finder is the most direct application of computer use to testing. You give it a Gherkin feature file and a URL. It works through each scenario against the live site and tells you what passed and what did not.
Input: A Gherkin .feature file and a target URL.
Output: A Markdown and HTML bug report, with animated GIF evidence for every failed scenario.
Gherkin is the plain-language Given/When/Then format many QA teams already use. An example scenario:
Feature: Todo App
Scenario: Add buy milk task
Given I open the todo app
When I type "buy milk" into the new todo input
And I press Enter
Then I should see "buy milk" in the todo list
And the number of items left should increase to 1
When something fails, whether that is a missing element, wrong behavior, or a visual issue that looks off, the agent records the failure, captures before-and-after screenshots, compiles them into a GIF, and moves on to the next scenario.

Bug finder pipeline diagram
The pipeline uses GPT-5.4’s built-in computer tool, which handles the screenshot-action loop natively. That saved us a meaningful amount of orchestration code, because the model manages the loop without us wiring it up manually.
Results: On a real application with artificially implanted bugs, the Bug Finder caught 27 out of 28 functional bugs and 6 out of 8 visual and polish bugs. Subtle visual regressions and edge cases in complex interactions can still slip through. However, a detection rate like that on functional issues is genuinely useful, and the GIF evidence makes handoffs to a developer unambiguous.
Pipeline 3: Playwright writer
Of the three pipelines, this is where the most interesting engineering decisions ended up.
The Playwright writer takes a natural-language flow description and produces a working, passing .spec.ts test file.
Input: A plain-language user flow description file and a target URL.
Output: A .spec.ts Playwright test file that passes against the live application.
A typical input:
Flow: Add a todo on TodoMVC
1. Wait for the page to load.
2. Type "buy milk" in the new-todo input and press Enter.
3. Confirm the new todo appears in the list.
4. Make sure that the newly created todo appears in the active tab.
5. Make sure that the newly created todo does not appear in the completed tab.
6. Mark the newly created todo as completed.
7. Ensure that the todo does not appear in the active tab and appears in the completed tab.
A Quick Note on Playwright
Playwright is a test automation framework for writing deterministic, reusable browser tests in TypeScript, Python, or JavaScript. You describe a sequence of user actions, and Playwright replays them against a live browser. The tests run headlessly in CI pipelines and tell you immediately when something in the UI breaks.
// Example: a Playwright test for a todo app
test('adds a new todo', async ({ page }) => {
await page.goto('https://demo.playwright.dev/todomvc');
await page.getByPlaceholder('What needs to be done?').fill('buy milk');
await page.getByPlaceholder('What needs to be done?').press('Enter');
await expect(page.getByTestId('todo-title')).toContainText('buy milk');}
);
Playwright also ships with a Codegen utility that records your actions in a browser and writes the corresponding test code in real time. This becomes central to the Playwright writer pipeline below.
Recording and Refinement
The pipeline runs in two stages.

Playwright writer pipeline diagram
In the recording stage, the pipeline spins up a Docker container running Playwright’s Codegen utility. The CUA agent navigates the application according to the flow description using xdotool for action execution, and Codegen captures every action as raw Playwright code. What you get is a rough spec: it technically captures the right steps, but selectors may be fragile, the structure probably does not follow the project’s conventions, and assertions are minimal. More of a scratchpad than a test.
In the refinement stage, that rough spec gets handed to three independent OpenAI Agents SDK agents running in parallel. Each one has access to:
- The application’s codebase
- The project’s code style guidelines
- The ability to grep through project files. They each independently produce a cleaned-up, production-quality version of the test. No communication between them at this stage.
A fourth agent, which we called the compiler, then takes all three candidates as input. It has the same codebase access as the others, plus one additional capability: it can run the test against Playwright and keeps iterating until it goes green.
Why three proposer agents rather than one? A single agent might make a confident but wrong assumption about how to select a particular element, and it will apply that wrong assumption consistently. Three independent agents working in parallel are much less likely to all make the same mistake. The compiler can look across all three candidates and pick the approach most likely to hold up. It is a simple idea, and in practice it makes the final test generation noticeably more reliable.
Real-world results: We validated the Playwright writer on a production project to generate 14 Playwright tests covering 10 features. The workflow was: pipeline output, developer review with some manual tweaks, then a pull request. A developer still reviews the output before it merges, but the investment shifts from writing a test from scratch to reviewing one that already passes. On a real project that difference is significant enough that the tool found its way into an actual PR workflow rather than staying in a prototype.
What did we learn about building CUA pipelines for UAT?
Running these pipelines on real applications produced some lessons that are specific enough to be worth sharing in detail.
Input quality is a performance lever. In traditional test runners, a vague scenario description mostly hurts readability. In agentic testing, it directly degrades performance. An agent given an underspecified step has to make assumptions, and those assumptions compound across the loop. We found that investing 10 minutes in writing tighter user flows for the Playwright writer pipeline consistently produced faster runs, lower costs, and more reliable tests than trying to compensate for loose descriptions with longer step budgets.
The screenshot-action loop creates a latency floor. Each action the agent takes requires a round trip: execute the action, wait for the page to settle, take a screenshot, send it to the model, and receive the next action. On simple flows this is barely noticeable. On complex multi-step scenarios, it dominates the total runtime, with some Bug Finder runs taking up to 30 minutes for a single scenario. Parallelizing across scenarios helps at the pipeline level, but the per-action latency is a fundamental constraint of the screenshot-based approach. If your flows are long and complex, budget accordingly.
Authentication state is an infrastructure problem, not an afterthought. Managing session cookies and auth state in isolated Docker containers is genuinely tricky. Getting it wrong means the agent starts every run on a login page and burns steps figuring out what to do. We built a cua-uat auth helper that handles the authentication flow once and produces a reusable credentials file. The lesson here is broader. Every piece of test infrastructure you take for granted in a local Playwright setup (cookie persistence, local storage state, environment variables) needs to be deliberately handled when you move into containerized agent environments.
The value of the Playwright writer is in shifting where effort goes, not eliminating it. The pipeline removes the blank-page problem: instead of writing a test from scratch, you are reviewing and adjusting one that already passes. A developer still needs to think carefully about test quality before merging. Reviewing a passing test is faster than writing one, though, and that difference compounds across a full test suite.
Conclusion
Computer Use Agents are a natural fit for UI testing because the task maps directly to what they do: observe a screen, decide what to do next, execute an action, repeat. Applying that loop to UAT removes the biggest friction points: writing tests from scratch, documenting user flows from memory, and manually clicking through scenarios before a release.
What we built does not replace thoughtful test design or experienced QA judgment. The pipelines have real constraints around speed, authentication, and the quality of the inputs you give them. But the entry cost for useful automated end-to-end testing drops significantly, and the fact that these pipelines are already part of real PR workflows on production projects tells us the approach holds up beyond a prototype.
There is a broader point here about agentic engineering worth naming. Tools like this tend to unlock one of two things: they either help teams go faster, or they help teams do things more safely and correctly without requiring a lot of additional engineering effort. The Playwright writer is a good example of the second. Generating a test that follows code style guidelines and actually passes is faster than writing one manually and it nudges the team toward the right way of doing things by default. Making the secure and proper path the path of least resistance is, in our view, one of the more underrated benefits of well-designed agent tooling.
If you are building on top of computer use agents or exploring similar applications in your own projects, I would love to compare notes. Get in touch via the ML6 contact page, or read more on our agentic AI engineering work 🚀.